Showing posts with label Makeover. Show all posts

Wednesday, December 12, 2012

Two Tone Tammy

I can't tell you how excited I am to be able to start sharing my nursery projects with you. I have been holding off doing anything until I reached 14weeks, just in case I jinxed it. But I am officially 18 weeks now and the projects have begun! I told you all about the vibe I was going for last week in this post. Neutral is the name of the game :)
 
Here is the checklist that I have started (and I am sure will evolve as I go) with what I want to do to get the room ready:
 
-design and sew bed skirt and bumper (bumper we will use when baby is a little older)
 
-makeover vintage dresser for changing table
 
-buy a crib
 
-rehang and accessorize chalkboard
 
-rewire standing lamp
 
-dress up back of bookcases
 
-reorganize closet
 
-figure out storage (toys, laundry, books)
 
-art for over the crib
 
-make pillows for bed
 
-find a home for old office space
 
All for as close to $500 as possible
 
 
The first project I tackled was the dresser makeover. And you all know how I love a good furniture face lift! Of course, I went straight to Craigslist to find something that was going to work. I wanted a dresser that was tall so changing baby would not kill my back, had good storage, and was not a true changing table. I would love this to be something that baby can use for a while.
 
I found this for a whopping $85.


Honestly, I really did like the original color, but it was not quite the right blue and it needed a little love.
 
First step was to remove the hardware, then sand and use a filler to fix any dents or chipped areas.


Up next was primer (2 coats).


I was debating going all blue like the one on my inspiration board, but then I realized the the pale blue kind of blended in to the light gray walls. Blah...
 
So I decided to go two-tone with it. A white body and pale blue drawers. I knew I liked the two-tone look from this side table project I did, and if it went south then it would just take a can of paint to fix. I already had the blue and the white semi-gloss paint from past projects as well as a foam roller. Whoop Whoop for having to buy NO supplies!
 
After two coats of each color, I accented the detailing that frames the doors with a thin pinpoint of white paint. I just used painters tape to make sure that it was not messy.


I loved the hardware so I was able to just reattach and the dresser was good to go!


I think baby will love it. If not, I will tell it how my back was sore for a week after painting this sucker, so that's just too bad!
 
All in all, I am in this project for $85. Not too shabby...


XOXO Katie

Best Blogger Tips Pin It
Wednesday, August 22, 2012

Oh Jackie

When vintage fashion and home decor combine its like hearing angels sing :)

Eight years ago there was an exhibit at the Field Museum in Chicago featuring Jackie Kennedy and what she wore during her time in at the White House. The pieces were stunning yet simple with clean lines and classic cuts.

As my mom and I were heading out I saw this poster in the gift shop and had to nab it up.
It was the perfect combination of vintage femininity with a modern vibe in the photography of the pieces.

Well, after I spent the weekend helping my parents go through our old house I decided that I could not bare to let go of this poster, and that it needed its due respect with a proper frame.

I am trying to decide what kind of frame and matte I should go with, so please help me out!


Here it is with a few different framing options. I am kind of loving it with either the the thin gold one (middle left) or the black one with white matte and back trim (bottom left). But what do you think???

Joey does not love the poster because it is too "girly", but I am thinking that for a powder room or little girl's room it might be perfect. Or for that giant walk-in closet of my dreams...but back to reality!


XOXO Katie
Best Blogger Tips Pin It

Monday, July 16, 2012

Mid Mod Makeover

I just can't do it....I just can't resist a good furniture flip!

Especially when the piece has a mid century modern vibe to it. If you remember a few months ago I redid this mod dresser that is now doing its duty as a storage unit in our made over closet for Joey's bizillion pairs of scrubs. Pieces from this era are pretty popular in the city so when I spot one with good bones I nab it up, refurbish it, and then sell it on Craigslist for a little cash.

I picked up this side table at the local thrift shop for a whopping $15. It was solid wood, but the top was looking a little tired, but the 60's styles legs were in great shape so I could not resist.


I gave it a quick sanding with my new palm sander (thanks Mom!),  and it was prepped for primer is less than 10 minutes. And yes, I do sand in the middle of my guest room :) Geez, I need a garage ASAP. I never thought that the top item on my future house wish list would be a garage or basement that I can make a mess...


Two coats of primer later and it was ready to go...


I used Benjamin Moore basic white in a semi gloss finish. The roller worked best for a smooth and even finish. Since the lines were straight and simple, it took only about an hour to do two coats.

I left the drawer in the natural wood finish because it was the only part that was still in great shape, so I just gave it a good cleaning to shine it up.

All done!


XOXO Katie
Best Blogger Tips Pin It

Tuesday, June 5, 2012

My Little Pony

As you know, I make frequent pit stops at my local thrift store to see if there is anything screaming out for a makeover. I keep an open mind because even if I don't need something for our place, I can always give a piece a new life and then sell it on Craigslist or Ebay.

My project this weekend was clearly not for us to keep. Unless you want to see a 6'2" 180 lb man having a flash back to his lost cowboy dreams. I tried to get Joey to just pretend to ride it...no luck. Too bad- I know a few of his brothers would have paid big bucks to see that! 

Meet my little pony:


At $9.99 I figured it would be a good project for a rainy day (and as I said yesterday we are having plenty of those) and I was excited to makeover something that would be on the more playful and on the girly side.

First, I removed the seat that was just tacked on with nail heads. Luckily the foam was in pretty good shape so I decided to reuse it later.


Time for a light sanding and a quick coat of all purpose primer.


The tail was a little discolored and grimy so that had to go. I felt like a surgeon trying to get the tail to wiggle loose as it was glued and and nailed inside. After a little muscle action I got it to come out.


After the primer was nice and dry I gave it a few coats of standard white semi-gloss paint and the put the foam seat back on with a hot glue gun.


The padding was cushy, but I thought it could use a little more batting to make it a soft ride for a toddler tushy. I simply tacked that on with a staple gun. Needless to say a standard staple gun is child's play compared to the one I used in my upholstery class, but it will have to do for the time being.


After a quick trim of the excess batting, I repeated this step with my fabric, but I stapled close to the bottom edge of the seat so that I could later cover it with my trimming.


And now for some girly action- pom pom trim! I used the hot glue gun to attach that along the bottom of the seat to cover all the visible staples.


I made a quick trip to the Deep (aka Home Depot) for a new tail and new handle bar for this girl. The tail is just industrial rope that they can cut to what ever length you need, and handle bar was a 5/8" dowel that I cut to size.


This pony is finally ready for a ride!

I just hope that the little girl that is lucky enough to take this home will appreciate that any ugly duckling has the potential to become a beautiful swan.


XOXO Katie
Best Blogger Tips Pin It

Wednesday, May 16, 2012

Garden Chair Gets Some Lipstick

I am totally craving some outdoor space now that the weather has made the leap to summer. Sadly, I am lacking any kind of fresh air retreat in this condo, but that does not mean I have to restrain myself from zesting up someone else's backyard!

I made my usual Sunday afternoon pit stop at my local thrift store and found these amazing mid century modern metal garden chairs. I was feelin' the Eames Era vibes from these chairs and I knew I could probably sell them in a hot second.

 Chances I find a full set of four? Slim to none. Chances are no rust spots? Zip. Chances they are only 6 smackers each? Zilch. And yet, here they were! These suckers were coming home with me :)


This is my favorite kind of furniture makeover- cost me less than $30 and more importantly, took me less than 2 hours from start to finish.

Spray paint is a simple and quick way to revamp furniture. I bought 3 cans of Rust-olum Painter's Touch in Berry Pink. Hard to believe that I went through 3 cans, but I did and my pointer finger is paying the price. Joey says the numbness will subside, but I am getting a little nervous since its been lacking any feeling over 3 hours later...


Just two quick coats of the paint...


**Please protect your eyes or you might be blinded by my insane paleness in the photo above. I tell myself that I will be wrinkle free when I'm 80- but I think that is just a coping mechanism.**


Now these chairs were all lipsticked up and ready to make some one's backyard sparkle...I just wish it were mine!

It pained me to put these up for sale on Craisglist, but I am sure they will find a happy home. The motivation behind doing these quick "furniture flips" is the knowing that the $$ they bring in will fund my future projects so I don't have to tap into any of our play money for DIYs. Got to love that!


XOXO Katie


P.S. I set a new record and these sold in less than 24 hours! Looks like more "furniture flips" will have to be in the works.

P.P.S No joke- my finger is still numb over 48 hours later. I strongly suggest buying those sprayer attachments. Its worth every penny because my numb finger actually hurts!

P.P.P.S. Wear grubby clothes and old shoes (hence my mismatched gym clothes and 10 year old flippy floppies). The back spray from the paint will getcha good!

Best Blogger Tips Pin It

Wednesday, April 18, 2012

Spring Cleaning Comes Out of the Closet

Time for a little spring cleaning for my walk-in closet. This DIY is not that exciting, but totally necessary for most people at least once a year.

My husband and I share one walk-in closet in our master bedroom. Its definitely a tight squeeze- that boy has a lot of clothes for a guy who is wearing hospital scrubs 99% of the time!

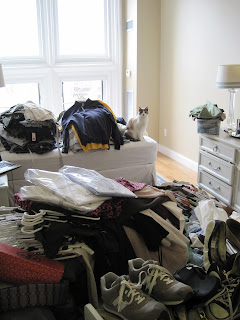
This is what our disaster zone looks like- eek!


So time to pull EVERYTHING out and start fresh. I made three piles- Keep, Donate, and Toss. Everything that I kept I had worn at least 2 times in the last year. Donation items were things that were still in good shape, just didn't fit or not my style anymore. And toss items included stained or ripped pieces.


You can see my bedroom look liked a bomb blew up in it, but it really helped getting everything out and taking a real inventory of what we had.

Once I rid the empty closet of the gross dust bunnies that made a nice little nest in the corners, I decided that I wanted to do something a little fun with the one wall that you can actually see. I have been swooning over large graphic stripes and I thought it wouldn't be too time intensive to do it in this small space.


All I needed was a measuring tape, pencil, and Scotch Blue Painters Tape. I measured from the top of the baseboard to the ceiling and it came out to be 89.5" (which I rounded to 90" for my own sanity). Then I decided I liked the look of 9" thick stripes.


I marked the wall (at 8 different points) 9" from the top of the baseboard. With the tape, I made the line all the way across the wall and made sure I pressed it down firmly. I knew I wanted to have the last stripe that would be against the ceiling remain tan, so that meant that the bottom stripe would need to be white. The one tricky thing to remember is where to place the tape when you are doing a contrasting color.

Example: Lets call color white "A" and the tan base color "B". When you are taping for an "A" stripe, then the tape will be on the outer edge of the line you marked. When you are taping for a "B" stripe then the tape will be on the inner edges. It will look a little funny when the tape is up because they won't look even, but once the tape is removed you will see why you did it that way.

Then I just moved up the wall until all of my lines were marked and taped. I did not measure from line to line- I always started from the top of the baseboard in case something got out of whack. So my lines were at 9", 18", 27", 36", etc...

Then I broke out the white paint and filled those suckers in!


It took me three coats because I didn't use a primer, but the wall was so small that it didn't take too long. I removed the tape as soon as my last coat was up. When doing graphic lines I have learned it is best to remove the tape quickly to get a crisp edge.

Here is the finished wall!


Now it was time to for the tedious part- putting back all of the clothes- ugh...

The Hubs clothes go on top, mine go on the bottom, and shelves were organized accordingly. All winter sweaters are stashed up top because we (hopefully) won't be needing them for a while :)

I had a mirror and a cute bench that I brought in now that there is a little bit of free floor space.
Ta-da!


Ok maybe not that exciting for everyone, but when there is clearly not enough closet space in our condo and any declutting is an improvement.


It love turning a very blah and neglected space into something cute and consistent with the style of the rest of the place. It makes it feel a little more cohesive.

Plus look at the cute view I now have from my bed!


Hopefully you all get some time in the next few weeks to declutter your lives and breath in the warm spring air!

XOXO Katie

You can also see this post featured on one of my fav blogs Monograms&Martinis!

Best Blogger Tips Pin It

Wednesday, April 11, 2012

Easy Mod Dresser Makeover

I frequent the local thrift shops in our neighborhood looking for small pieces of furniture that I can restore and find home for, or resell for a few extra $$. Last week I found this beauty-a real stunna right? Yeah...not so much. But the lines were great and the price was right- $19.99 + 20% off! That girl was mine:)


First, I gave whole piece a good scrub down with cleaner and removed all the old hardware. There were a few scratches and holes from the old handles that needed filling so I used some wood filler and sand paper to smooth them out.


There was a slight glossy finish, so I only had to give it a light sanding.
I broke out my standard Benjamin Moore All-Purpose Primer and applied two VERY light coats with a 4 inch sponge roller and a 2 inch sponge brush. I made sure there were no drippies and that the coats were completely dry before applying the next one.


I choose Behr's Rain Washed in a semi-gloss finish for the main color. I was debating over using a semi-gloss or high gloss so I went to the experts- Sherry and John Petersik from Young House Love. If you are not familiar with this couple- they are like the Brad and Angelina of the DIY blog world. I emailed them asking what finish they would recommend for my dresser and they wrote back, "For furniture we like semi-gloss so it's wipeable and holds up really well!"


I applied two coats with a fresh 4 inch sponge roller and sponge brush. I prefer the sponges over a brush to prevent any brush strokes from showing once it dries. And honestly, its just faster!


After letting her dry, it was time to get the drawer handles marked and prepped.
I bought four 10 1/4" stainless steel bar pulls from Home Depot for $10.47 each. You can buy them online here. They were a little pricey when you add them all up, but I loved the look and decided to go for it anyway.

The best way to make your dots on the drawer fronts for handles is to create a template so all the markings will be the exact same.

Here is a step-by-step guide on how to do that:

1. Trace your drawer (face down) on a piece of paper or cardboard then cut it out

2. Mark a vertical line down the middle indicating the center of the drawers width

3. Mark a horizontal line indicating the center of the drawers height

4. Measure the length of the handle you choose (length between the screws- not the full length of the pull)

5. From the center where your two lines from Step 2 & 3 make an X, measure and mark where your pull screws should be (the center would be at the X and the marks will be on the horizontal line) 

Now you have made an easy template for your pulls!

I used this to guide to tap in a nail mark at the places where I needed to drill the hole for the screw. Then I used my 1/8 inch drill bit to make the proper holes.


The final step was to screw in the pulls!


From yucky pinky black to gorgie mod blue in about 4 hours!


XOXO Katie


Best Blogger Tips Pin It

Monday, April 2, 2012

Front Door Makeover: Phase 1

Our condo's front door was a sorely neglected surface that was pretty beat up during the renovation process and then never addressed. But an email from our board saying that all doors were going to get a paint job sparked my interested in doing a mini makeover.

The tough part about living in a condo building is that it can be really tough to personalize your space without getting the neighbor's panties in a twist. Anything too loud or festive does not go over well in my building, so I think anything fun is out of the question.

So this begins Phase 1 of my front door makeover: Green it Up

I would like to formally introduce my new girl, Fern. Actually, she is formally known as Fern #2 because we had a little plant thief that was trolling through about a year ago and stole Fern #1 (cue single tear).


She was a great find out Costco this weekend. A three gallon Boxwood for only $17! There were tons to choose from, but I liked her shape and size the best. Costco, you always amaze me...an entire lunch from your free samples PLUS a deal on this beauty.
Then we headed to Home Depot where I choose a somewhat simple 16" plastic pot with a little detail and not too cheep looking. I was looking for a textured one that I could easily paint since I knew I wanted it to be a glossy black finish. I made sure it was for indoor use and there was no hole on the bottom. I'm guessing my building would not love a leaky plant on the carpet. This one was $16.


After bringing it home and putting it outside the door it was looking a little shrimpy. So after hunting around for a little stand, I realized that in my pile of Costco goodies I had a perfect sized box from a unnecessarily large stash of whole wheat pasta. I made sure it could hold the weight of the pot + my girl Fern = success!


I broke out the can of black high gloss paint and gave both the box and the pot two coats.


Now it is a better height, and I didn't have to go buy a $50 plant stand.

I am not married to her location, but its definitely added a little life to our front door.


So now that Phase 1 is complete I will have to wait for Phase 2: Paint.

Unfortunately, the color and timeliness of this next phase is not up to me. The building has chosen a color and they won't let the owners paint it themselves. So alas, I don't know when this next step will get completed, but I will be pleased when it does!

This is a simple project that you can do even as a renter- the best part is you can take the plant with you when you leave!

XOXO Katie
Best Blogger Tips Pin It