Monday, April 30, 2012

My Shades of Gray...

Of course I have jumped on the bandwagon and ordered myself a copy of Fifty Shades of Grey and I can't wait to start! According to my girlfriends, its as addictive as Twilight but totally steamy...like late night HBO steamy...And with all the buzz going on about this book I can't wait to jump in and see what is making everyone squeal:)

So with this page turner in mind, I have compiled a little collage of 
my fave shades of gray.


All of these images are "Pin"sperations that I have compiled from various websites. I have used gray as my "neutral" throughout our apartment- such a great backdrop and the options for accent colors are endless. I am guessing once I finished this book we will be seeing a lot of blush pink accents around here:)

XOXO Katie
Best Blogger Tips Pin It

Friday, April 27, 2012

Memo Demo!


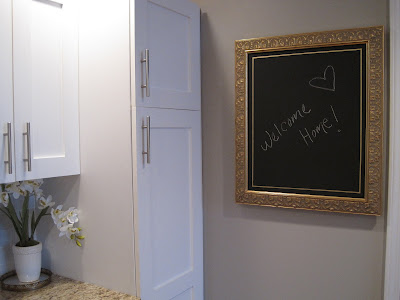
My kitchen was sorely lacking any kind of message or memo board, and with sticky notes piling up covered with to-dos I decided a chalk board was the way to go. I saw this one form Ballard Design, but at over $150 it was NOT in the bugdet.


So I kept an eye out at the local thrift shops and I found this beauty for a whopping $8. It was just the right size to cover a not-so-strategically-placed electrical box that was an eye sore in the middle of my kitchen.


I had a scrap piece of really thin (1/4") plywood that would be a good backing for the chalk board. I just traced the opening of the frame on to the plywood and measured 1/4" beyond that line so that it would snuggly fit in to the back lip of the frame. The plywood is so thin that I could cut it by scoring it with a utility knife a few times. (Always a good idea to score something directly on top of your wood floors- NOT! Poor decisions...lesson learned) 


Next came the chalk board paint- two coats later and this sucker was ready to go.
I thought it needed a little detail action so I broke out the tape and my fave gold leaf paint.


With a quick coat of the gold leaf (that I am obsessed with as I mentioned here), I painted between the two pieces of tape. One tip is to remove the tape right after you have finished painting the boarder- that will help you get those clean, crisp lines.


I left it to dry for an hour and the just set it into the frame.


Not bad for an $8 frame and stuff I had around the house. This would look great in an office or a mudroom for those last minute reminders and grocery lists. If only I had a mud room...I can dream:)
Always keep an eye out in thrift stores or at garage sales- there are always hidden gems and with an open mind you can recreate things you see online or in a a magzine for a fraction of the cost:)

Have a great weekend!

XOXO Katie

You can see this post and tons more at Monograms&Martinis!
Best Blogger Tips Pin It

Wednesday, April 25, 2012

A. Liz Adventures Gets Her Pom Pom On

Exciting things happening here today - I am doing my very first official blog giveaway over on  A. Liz Adventures!


April has been sweet enough to host a free- did you hear that?? FREE!-  giveaway of one of my signature Pom Pom Scarves! Not only that, you get to choose ANY color that you want! 

 You have 4 ways you can enter:

1. Become a follower of my blog and
in the comments below say "A.Liz Adventures sent me!" and let
me know what color scarf you would want to rock this spring :)

2. "Like" my blog on Facebook and say "A.Liz Adventures sent me!"

3. Mention this giveaway on your on blog with a link to

4. Add At Home When I'm Wtih You
& A. Liz Adventures to your blogroll

Every one of these actions counts as a new entry so the more you do the better your chances of winning will be! Hurry ladies- You will only have one week to enter before the luck gal gets announced by April.


Dont want to wait a week for your Pom Pom Scarf? You don't have to- SHOP NOW!


XOXO Katie

Best Blogger Tips Pin It

Tuesday, April 24, 2012

Dust Bunny Invasion

After almost a month of blogging, I am happy to finally introduce my two very adorable and fuzzy girls!


Lovin' some nap time :)

Now, I understand that not everyone is a "cat" person, but how could you not love these cutties?! Their names are Wess (aka Wessie Bear), and Taters (aka Tattie Belle), and they are twin sisters that we adopted just over a year ago. I love these nuggets and I am proud to say that I am a fully obsessed cat lady. I have been known to say, "I love them so much I feel like I birthed them!" which in turn totally freaks Joey out and he get embarrassed to be married to all o' this:)

All joking aside, these babies were about the only things that keep me sane through the crazy weeks of the hubs working nights, and a few (ok maybe "few" is a relative term- more like chronic) bouts of homesickness for the Chi.

Come on- baby kittens? Adrobs

With every pet there are some things you have to get used to, but overall these girls have been amazing. They don't scratch, bite, or attack our furniture. But there is one thing that does haunt me in my sleep and seems to be taking over our home...the elusive, and ever morphing DUST BUNNY.

 
These dust balls seem to multiply like lemmings and I can't seem to get a handle on it. Hidden in every corner and under every piece of furniture, the second I sweep them up more appear. I think the time has come to start saving up for my future best friend- Miss Roomba.


At $300+, this sucker not a buy on a whim kind of item. I am trying to find an alternative before I make that kind of investment, but so far the idea of breaking out the vacuum more than once a week is really not appealing.

This may be a Craigslist find- so I will be doing a little stalking for the next few weeks. Hopefully, I'll get lucky:)

Does anyone have a Roomba already? Do you like it, or is it something that you use once and then regret purchasing? Also, does it freak your pets out? My kitties are scared out of their whits by the vacuum, so I am afraid this would send them over the edge if it was moving around on its own.

XOXO Katie


Best Blogger Tips Pin It

Monday, April 23, 2012

"Nearly" Handmade Spring Vase

Honestly, I am a total sucker for fresh flowers. I say all the time that when I win the lottery (which I am convinced will happen, as I stated here) that I want to buy fresh flower for the house every week.

This last weekend just confirmed that love. These were some of the gorgeous buds we saw while walking around our neighborhood and at a tiny farm nearby:


The flowers got my wheels turnin'...beautiful flowers need a beautiful vase right?? I only had a super simple round vase on hand and that was just a little too plain Jane for me.

This is when the idea for the "nearly" handmade vase bloomed- don't mind the pun :) A little stone clay and some channeling of my inner Demi Moore circa Ghost turned my cheapo vase into a personal fav.

I was inspired by grandma, Marilyn Brown, and her amazing oil paintings. She was the talent behind the painting in my dining room.


I used this rose as my model for a stone clay creation.
First, I headed to the art supply store and bought Stonex stone clay in white. It's like Playdough for adults- it is soft and smooth to the touch and then air dries in about 36 hours. No need to bake or seal.


I wanted it to look 3 dimensional so I molded 3 sizes of petals with my palm. This was super simple; the large petal was a ball about the diameter of a quarter, the medium petal was a nickle, and the small petal was a dime.


I wanted the leaves to look natural, so no two petals looked alike. Mother nature is not perfect so why would I have to be, right?


 The next step is to layer and fuse the petals to form the rose; large on bottom, medium next, and then small. I also made a few baby petals to fill up towards the center of the rose. You might say "Ew!",  but I would just lick my pointer finger and make a little paste-like glue with the clay to get them to really stick together. You should try to do this while the clay is still really pliable and moist- or else it will start to crack on you.


According to the box, I just needed to let it air dry and that the drying time depended on the thickness and size on my project. Mine took about 36 hours to fully dry.

Once dry, I whipped out the gold leaf paint (of course) and glammed those petals up!


I broke out the StrongStik (similar to Liquid Nails) and dabbed about a quarter sized glob on the back of the base to fuse it to the vase.


With my patience nearly running out, I waited another 24 hours for that glue to harden...but I could not be happier with the result!


I have about 95% of the box of Stonex left so I am excited to do a few more projects like this.

I was also thinking that this may be a great bridal shower gift- what do you think?

XOXO Katie

P.S. The art behind the vase is another version of my DIY Paint Chip Art


Best Blogger Tips Pin It

Friday, April 20, 2012

Paint Chip Picasso

We have all seen some creative juices flowin' with paint chip art (if your a Pinterest addict like myself), so I wanted to give it a try. I needed a little pop of color to pull my new desk accessories together and I had a budget of a whopping $0.

Here were a few of my inspiration idea:

via Younghouselove.com 
via addicted2decorating.com


After spending some quality time in the Home Depot paint section, I landed on a green palette that would coordinate with the other colors in the room. I know its not stealing since they are free, although when hoarding 20 different paint chips (many of the same color) I can't help but sense the dirty looks from the paint store guy shooting into the back of my head. Too bad, so sad- I don't see any price tags!

You will need the supplies below:

Paint chip cards
Frame (mine came with the matte)
Clear tape
Ruler
Pencil
Scissors


Using the frame matte as a template, I was able to map out how I wanted to cut my swatches to create a design I liked.

And with a little ruler and scissor magic I had everything ready to tape.


The look I was going for was clean and simple, but you can arrange the swatches any way you would like. I used the picture that was in the frame as a guide for lining up the swatches- you can't see through them so the photo will be covered in the end. I also alternated starting from left to right so that my seams did not line up.

Just tape them down as you go.


Its as easy as that!


This can be done with any colors, and to any scale. Nothing beats free art that can be completed with regular household items, and in less that 30 minutes. These would make a great gift as well so keep that in mind the next time you want to get something for someone special!


Did anyone else try a cute paint chip project out there? With endless options- its so fun to hear how people can personalize this project.

XOXO Katie

Check out this post and other great goodies at Monograms & Martinis

Best Blogger Tips Pin It

Thursday, April 19, 2012

My Addiction...To Glam

I have a full on heavy-duty, may-need-therapy-due-to-separation-anxiety, obsession, crazy-addiction to my AMAZING gold leaf paint. Admitting that there is a problem is the first step to recovery right?

Actually, I don't want to recover from this addiction to glam...
I would say 99% of the time, if I don' t know where to go with a project I will slap some gold leaf paint on it and it takes on a new life.

My brand of choice is Sheffield Bronze Corporation Rich Gold Leaf Finishes


This stuff is amazing- the 2oz little bottle goes a long way and I use a regular paint brush to apply it. Not a furniture paint brush, but like a paint brush for painting on canvas- I'm sure there is a technical name for it but I'm feelin' a little too lazy to figure it out :)

The coverage is really smooth and it really looks like gold leaf, not just cheapy gold paint pretending to look like gold leaf.

I pick mine up at the True Value that is down my street, but I was able to find it on Amazon (don't mind Amazon's old school pic- that's the right stuff). A total value at just under $3.50 a bottle.


XOXO Katie

Just an FYI- as I was looking at the bottle to get info for this post I read that you are supposed to wear a mask while applying it, and not have prolonged exposure to its fumes. And that you should avoid using while pregnant. This is true for ALL gold leaf metallic paint, not just this brand. Good to know...good thing I am not preggos or I might have a 2 headed baby on the way! Looks like I need to invest in a mask :)

Best Blogger Tips Pin It

Wednesday, April 18, 2012

Spring Cleaning Comes Out of the Closet

Time for a little spring cleaning for my walk-in closet. This DIY is not that exciting, but totally necessary for most people at least once a year.

My husband and I share one walk-in closet in our master bedroom. Its definitely a tight squeeze- that boy has a lot of clothes for a guy who is wearing hospital scrubs 99% of the time!

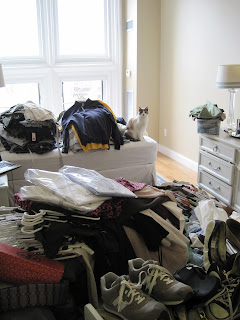
This is what our disaster zone looks like- eek!


So time to pull EVERYTHING out and start fresh. I made three piles- Keep, Donate, and Toss. Everything that I kept I had worn at least 2 times in the last year. Donation items were things that were still in good shape, just didn't fit or not my style anymore. And toss items included stained or ripped pieces.


You can see my bedroom look liked a bomb blew up in it, but it really helped getting everything out and taking a real inventory of what we had.

Once I rid the empty closet of the gross dust bunnies that made a nice little nest in the corners, I decided that I wanted to do something a little fun with the one wall that you can actually see. I have been swooning over large graphic stripes and I thought it wouldn't be too time intensive to do it in this small space.


All I needed was a measuring tape, pencil, and Scotch Blue Painters Tape. I measured from the top of the baseboard to the ceiling and it came out to be 89.5" (which I rounded to 90" for my own sanity). Then I decided I liked the look of 9" thick stripes.


I marked the wall (at 8 different points) 9" from the top of the baseboard. With the tape, I made the line all the way across the wall and made sure I pressed it down firmly. I knew I wanted to have the last stripe that would be against the ceiling remain tan, so that meant that the bottom stripe would need to be white. The one tricky thing to remember is where to place the tape when you are doing a contrasting color.

Example: Lets call color white "A" and the tan base color "B". When you are taping for an "A" stripe, then the tape will be on the outer edge of the line you marked. When you are taping for a "B" stripe then the tape will be on the inner edges. It will look a little funny when the tape is up because they won't look even, but once the tape is removed you will see why you did it that way.

Then I just moved up the wall until all of my lines were marked and taped. I did not measure from line to line- I always started from the top of the baseboard in case something got out of whack. So my lines were at 9", 18", 27", 36", etc...

Then I broke out the white paint and filled those suckers in!


It took me three coats because I didn't use a primer, but the wall was so small that it didn't take too long. I removed the tape as soon as my last coat was up. When doing graphic lines I have learned it is best to remove the tape quickly to get a crisp edge.

Here is the finished wall!


Now it was time to for the tedious part- putting back all of the clothes- ugh...

The Hubs clothes go on top, mine go on the bottom, and shelves were organized accordingly. All winter sweaters are stashed up top because we (hopefully) won't be needing them for a while :)

I had a mirror and a cute bench that I brought in now that there is a little bit of free floor space.
Ta-da!


Ok maybe not that exciting for everyone, but when there is clearly not enough closet space in our condo and any declutting is an improvement.


It love turning a very blah and neglected space into something cute and consistent with the style of the rest of the place. It makes it feel a little more cohesive.

Plus look at the cute view I now have from my bed!


Hopefully you all get some time in the next few weeks to declutter your lives and breath in the warm spring air!

XOXO Katie

You can also see this post featured on one of my fav blogs Monograms&Martinis!

Best Blogger Tips Pin It

Tuesday, April 17, 2012

Hittin' the Silver Screen

I am going to preface this with "this is probably only exciting to me..." but I am thrilled to announce that my DIY dresser formally known as the "Green Monster" has hit the silver screen!

I don't have a great "before" pic of this bright green beauty, but you can see her on the left hand side of this pic. That was our very first apartment in Chicago- we LOVED that place, all air conditionless/right next to the EL tracks/ 600 square feet of it :) Great memories of our first year as newlyweds.


Joey was not the biggest fan of her "unique" color, so when we moved to Boston I gave her a simple coat of white semi-gloss paint and changed out the handles for rose colored crystal and brass pulls. That was just a temporary fix- the scale was not right for our bedroom so eventually onto Craigslist she went.


When scheduling a pick-up with the Craigslist buyer, the girl mentioned that she was a set designer for an upcoming movie that was being filmed in Boston. She said the movie was a rom-com staring Mila Kunis and Mark Wahlberg. I took in all this info with a grain of salt, but when a moving service came to pick up the dresser and I had to sign a bunch of paperwork validating the sale, I thought the girl may not have been totally full of it.

Flash forward one year to me sitting at work and my boss sends me a link to a movie that made him literally giggle like a little school girl.


This is the trailer that he sent over for the movie Ted.

I sat watching and thinking, "There is a teddy bear humping a cash register, such boy humor..." and then BAM!!! MY GREEN MONSTER AT 00:45!!!!!


Such a celeb!! What are the chances that of all movies for my boss to send over, of all the scenes to include in the trailer, what are the chances that the Green Monster would be right there!? Sometimes the world works in mysterious ways...

Very exciting for a DIYer like myself, nothing could be better than one of my projects up on the big screen :)

XOXO Katie
Best Blogger Tips Pin It

Monday, April 16, 2012

Monday Night Fiesta Talapia and Rice

This is a great simple recipe that I whipped up out of things I had in our fridge- no dreaded after work trips to the the grocery store!

Fiesta Talapia and Rice

Time: 30mins
Difficulty Level: Easy


There are three components to this meal; guacamole, seasoned talapia, and the rice side dish. So let's start with the guac!

Ingredients:
2 avocados
1/2 red onion
1 medium tomato
1 jalapeno
1 Tb. lemon juice
1tsp. red pepper flakes
salt & pepper

This recipe is super simple- just combine all the ingredients (except the salt & pepper) in a mixing bowl after chopping up the tomato, onion, and jalapeno.


Use a fork to smash the avocados and mix all of the ingredients together. I hold off on the salt and pepper until everything is mixed and then add it in to taste.


Now its time for the seasoned talapia.

Ingredients:
2 talapia fillets
1tsp. cumin
1tsp. cayenne pepper
salt & pepper

I like to make mine in our toaster oven because it takes less time to preheat. Set the heat to 400 degrees.

Cover a pan with tin foil and spray it with cooking spray.
Pat dry the talapia fillets with a paper towel then sprinkle on the cumin, cayenne, salt, and pepper. Cook for 18-20 minutes or until the fish flakes apart with a fork and cooked through. 


The final step is the veggie rice.

Again, this side dish is super simple and relatively healthy. 
Ingredients:
1 boil-in-a-bag brown rice
1/2 red pepper
1/2 red onion
1 cup corn
(would be great with fresh corn, but its not in season yet!)
1/3 cup salsa
1/2 Tbs. butter
salt & pepper

Cook the rice according to the directions on the box. Mine was a 10 minute rice so I just had to boil the bag and set the timer. While this is cooking, chop up the red pepper and onion.


Remove the rice and discard the water, then put the onion, pepper, corn, salsa, and butter in the same hot sauce pan that you used for the rice. Saute the veggies until they start to become tender.


Add back in the rice and mix all the yumminess together! You can salt and pepper to taste, but it won't need too much because of the saltiness of the butter.

All done! Just plate and serve- your family will love it and think you spent the night slaving over this dish. Pair with a margarita and make it a real fiesta!


XOXO Katie
Best Blogger Tips Pin It