
As you know, I make frequent pit stops at my local thrift store to see if there is anything screaming out for a makeover. I keep an open mind because even if I don't need something for our place, I can always give a piece a new life and then sell it on Craigslist or Ebay.
My project this weekend was clearly not for us to keep. Unless you want to see a 6'2" 180 lb man having a flash back to his lost cowboy dreams. I tried to get Joey to just pretend to ride it...no luck. Too bad- I know a few of his brothers would have paid big bucks to see that!
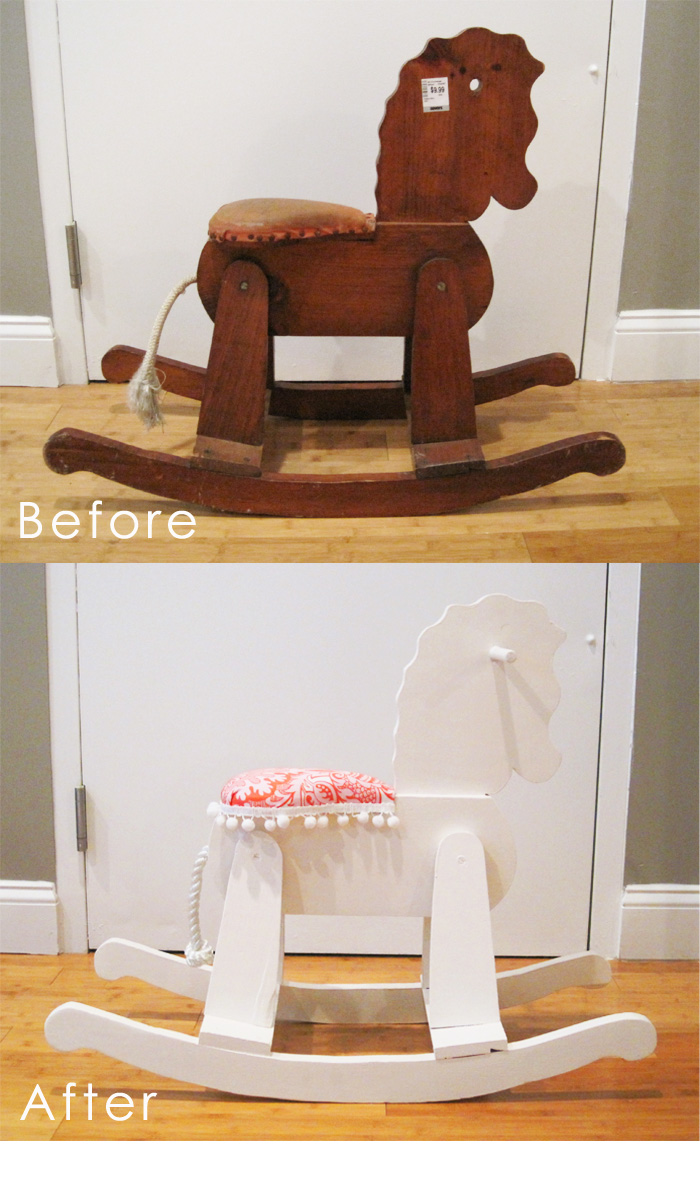
Meet my little pony:
Meet my little pony:

At $9.99 I figured it would be a good project for a rainy day (and as I said yesterday we are having plenty of those) and I was excited to makeover something that would be on the more playful and on the girly side.
First, I removed the seat that was just tacked on with nail heads. Luckily the foam was in pretty good shape so I decided to reuse it later.

Time for a light sanding and a quick coat of all purpose primer.

The tail was a little discolored and grimy so that had to go. I felt like a surgeon trying to get the tail to wiggle loose as it was glued and and nailed inside. After a little muscle action I got it to come out.

After the primer was nice and dry I gave it a few coats of standard white semi-gloss paint and the put the foam seat back on with a hot glue gun.

The padding was cushy, but I thought it could use a little more batting to make it a soft ride for a toddler tushy. I simply tacked that on with a staple gun. Needless to say a standard staple gun is child's play compared to the one I used in my upholstery class, but it will have to do for the time being.

After a quick trim of the excess batting, I repeated this step with my fabric, but I stapled close to the bottom edge of the seat so that I could later cover it with my trimming.


And now for some girly action- pom pom trim! I used the hot glue gun to attach that along the bottom of the seat to cover all the visible staples.

I made a quick trip to the Deep (aka Home Depot) for a new tail and new handle bar for this girl. The tail is just industrial rope that they can cut to what ever length you need, and handle bar was a 5/8" dowel that I cut to size.


This pony is finally ready for a ride!
I just hope that the little girl that is lucky enough to take this home will appreciate that any ugly duckling has the potential to become a beautiful swan.
XOXO Katie
 Pin It
wow that looks awesome!! :) Great job!
ReplyDeleteThanks!
DeleteWow! I would have loved that when I was little! I'm so impressed!
ReplyDeleteThank you!
DeleteI wish I had a little girl. I would totally buy this from you!
ReplyDeleteMe too right?! I hope it goes to a girl that will love it too!
DeleteGreat makeover! My mom is saving mine from when I was little and I think it needs just this!
ReplyDeleteAww that so cute of your mom to do- good idea!
DeleteWhat a gorgeous makeover! I love seeing the transformation and love the way it turned out, great job!!
ReplyDeleteThanks for reading!
Deletewhat a great project, it turned out adorable
ReplyDeleteThank you- thanks for stopping by!
Deleteadorable! i have a little rocking horse i'm bringing back to life, too. would you recommend taking it apart and painting each piece or paint as a whole?
ReplyDeleteI'm in love with this rocking horse! It's absolutely adorable and such a great tutorial!
ReplyDelete